

How To Clean A Camera Sensor With Ibis
Learning how to clean a camera sensor is essential if y'all don't want to risk permanently damaging your sensor. With the correct tools and tips, yous can clean your photographic camera sensor at home in a couple of minutes.
You'll salve money from having to get it professionally cleaned, and yous'll go better quality images and videos.
Nosotros'll guide you through the cleaning process on different cameras and give you pointers and tips to make certain you're not doing anything that'll damage your gear.
By the end of the guide, you lot'll have the noesis and conviction to clean your camera'due south sensor safely. You'll know what cleaning tools and techniques to avoid and all the good practices.
Allow'southward bound into the guide!
How to Clean Camera Sensors like a Pro
We're going to look at what you demand to do to clean a standard DSLR and mirrorless cameras. We'll cover the tools needed for each and bust a couple of common myths and poor cleaning techniques.
We strongly advise you to stick to the gear recommendations and proper sensor camera cleaning kits as straying too far from the path could cause irreparable damage and cost y'all tons of coin.
Permit's get started!
Why Information technology's Important to Clean Your Camera's Sensor
Cleaning the photographic camera sensor is one of those frequently overlooked tasks that photographers tend to ignore. Ofttimes, they're agape of doing more damage than skillful – and this is a off-white fright.
I wrecked the sensor on my kickoff DSLR and that taught me some proficient – albeit expensive – lessons that I've never forgotten.
Every time you alter your lenses, you're giving tiny dust particles a brief chance to brand it into the lens crenel, and ultimately onto the imaging sensor.
Dust sticks to this surface like no-mans' business concern and volition slowly build up over time – especially if you're into outdoor photography.
These clumps of dirt and dust can testify up on your images and videos every bit blurry blobs that are quite piece of cake to spot. Having your sensor cleaned is the merely way to get this dirt off.
This is where it gets tricky if you mess effectually too much. There'due south a lot of misleading data on the internet that tin can wind upwardly ruining your camera or leading to an expensive mistake.
Now that you know why cleaning the sensor is important, let's look at how to get it done.
How to Clean a Mirrorless Photographic camera Sensor
Cleaning a mirrorless camera's sensor is a little easier equally yous don't need to worry about getting the mirror out the way. The caveat is that they tend to get dirty fifty-fifty quicker than other cameras.
I used these steps when I was learning how to make clean a camera sensor past Sony, but you tin can use it on any photographic camera brand.
You'll need a proper sensor cleaning toolkit. Altura makes some awesome kits with camera sensor cleaning swabs designed specifically for different sensor sizes in unlike cameras.
We'd suggest you not to endeavor replacing these tools or trying any DIY swabs and builds. It'll put your sensor at a far greater risk of being damaged.
Make sure the sensor cleaning kit you go has the following tools:
- Rocket blower or other handheld air blowers
- Sensor swabs that match the size of your photographic camera'due south sensor
- Sensor cleaning fluid
Here are some tools and materials to avoid using:
- Fluffy Q-tips as they get out residual and streaks backside (from quickly picking upward moisture from the air)
- Rubbing or cleaning alcohol
- Compressed air cans (as they have propellants that tin damage the sensor
With all this in heed, let'due south move onto the steps to cleaning your mirrorless camera's sensor.
Step 1: Have a Examination Picture
We want to see how much dirt and dust has built up and how much it's affecting your photos and videos.
To get the test picture, conform your aperture to the smallest possible size (maximum zoom, due east.1000. f/22).
Accept a photo of a clean white sheet of newspaper, making sure the newspaper tin be seen in the entire photo. Motility the camera slightly so that the prototype is a little blurry.
Transfer information technology over to your reckoner and use a photograph editing app to evidence y'all where the nighttime spots on the photo are. If y'all're using Photoshop, the "Auto Levels" feature is first-class for this and clearly shows you where all the dirt is.
Read More: How to Use a Kodak Disposable Camera
Step 2: Remove the Lens
By now you should know how to accept a lens off your camera. If you lot don't know how to, find your user manual or online version and expect for the didactics.
Pro Tip: Ever tilt your lens downward when you lot're removing or changing them. This helps stop dirt and grit from drifting into the lens crenel.
Place the lens down safely in a dry and dust-free spot. Proceed the camera pointing down toward the ground.
Pace iii: Blow the Clay Abroad
Using the Rocket Blower or whatever handheld blower (not compressed air cans), accident at the imaging sensor. Make sure not to go besides close to the sensor and never touch it.
Accident from different angles all and aim information technology all over the sensor for the best results.
Stride 4: Taking a Second Exam Epitome
Put the lens dorsum on apace and take another test picture of the aforementioned canvas of paper in the same lighting. This might seem like a waste of time, only the blower is often enough to clean the sensor.
Even though we'll be using proper sensor cleaning wipes, it'southward always a good idea to limit the corporeality of touching your sensor. Information technology's less risky that mode.
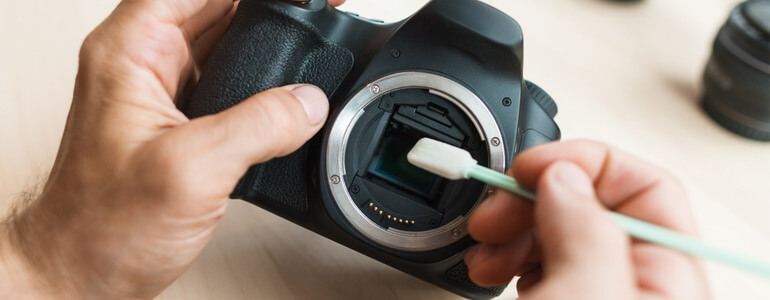
Footstep 5: Wiping Away the Clay
If the previous steps have failed to remove the dirt, this pace won't. You'll need the sensor cleaning swabs for your cleaning kit.
Brand certain they're fresh and in unopened packaging. Become your sensor cleaning fluid and dab it onto both corners of the tip.
Y'all want information technology to be damp, not dripping wet. Looking at your sensor, wipe it gently but firmly from right to left. But use one stroke and wipe the whole sensor in one motion.
Flip the swab over to its reverse side and wipe the sensor again in the same direction you did the kickoff time.
If you've done this correctly, at that place won't be any dirt or grit left on the sensor.
Step 6: Taking the Last Test Picture
Put your lens back onto the photographic camera. Take 1 last test moving-picture show the same way you did the other ii. You should have a clear image with no visible dirt or dust.
If there are still markings, then y'all should go information technology professionally washed past a camera sensor cleaning service. Exercise an internet search for "camera sensor cleaning nearly me". Have it in and have it looked at.
Read More: How to Detect a Hidden Camera in Mirror and Clandestine Spots
How to Clean the Sensor of a Camera that has a Mirror
The only difference between cleaning these cameras is lifting the mirror so you tin can access the imaging sensor.
We'll show you lot how to do that safely and easily. We're going to leave the examination photos out of these steps, but you should exercise them if between whatever of the cleaning steps.
There's a good chance you won't need to motility on to the more complicated and risky cleaning steps.
Pace 1: Use Your Camera's Automatic Sensor Cleaner
If yous're lucky, this will shake the dirt off. A lot of modern cameras have this feature and it can be accessed through the tools department of your menu.
The tools section is often the last section in the menu and shows the usually marked by an icon of a spanner caput.
Run the feature a couple of times to dry make clean off the dirt. Once you're done, have another test moving-picture show to run into if it worked. If information technology didn't, motion on to the next steps.
Footstep 2: Lock the Mirror Up
The very first thing to do is to make sure your camera'due south battery has a 100% accuse. This is important because many cameras won't even let you access this setting without a fully charged bombardment.
Get into your menu and browse for a feature called "Lock Mirror Upward for Cleaning". This looks different depending on the make you're using, so expect for something similar.
This volition lock the mirror upwards and you can go alee and have off your lens.
Step 2: Using the Manual Air Blower
Recollect non to employ any compressed air for this footstep. It's important to concord your photographic camera upside down so that the opening is facing the floor.
If the blower frees any dirt, the terminal thing y'all want is for information technology to be sitting around nearby. Holding the photographic camera upside down helps to flush the dirt out of the imaging sensor'south cavity.
Blow at the sensor without ever touching information technology and don't become the blower's nozzle too shut either.
Do this for a while and endeavor another test image to check your progress (or skip to the next cleaning step if you know information technology needs a thorough cleaning).
P.Southward. If you're going to take a test photo, remember to turn off the camera to reset the mirror. You'll need to elevator information technology again via the transmission settings.
Stride iii: Using the Sensor Cleaning Swabs
Make sure they're fresh out of their packaging and have never been used before. Get your sensor cleaning liquid and dab both corners of the tip. You lot want it a little clammy, simply not dripping.
In ane clean, house simply gentle motion, wipe the sensor from right to left. Keep the single motion controlled and non as well fast. Flip the swab over and wipe the sensor with the opposite side, in the same direction every bit the first.
Throw away that swab as you lot tin never use it once more for cleaning a sensor.
You can take another examination photograph now. Retrieve to plow your photographic camera off and back on to reset the mirror.
You should have got all the dirt off the sensor and the photo shouldn't show any clumps or nighttime spots.
If you're still seeing them, you need to take the camera to a camera sensor cleaning service to have it looked at by experienced professionals.
Some Additional Tips and Warnings
There are loads of sites online that say y'all can make clean photographic camera sensors with a Q-tip. You should never do this. These tips shred when you lot wipe with them.
This leaves behind a residual that can impairment the imaging sensor and ruin the quality of your shots. Ever use defended sensor cleaning swabs that are the right size for your sensor.
You should also avoid using rubbing or cleaning alcohol. Aside from being able to damage your sensor direct, this booze sucks in wet from the air when it'southward on a swab.
This leads to streaky finishes on your sensor that'll mess with the image quality.
Whenever yous're changing lenses or cleaning the sensor brand sure yous're in a sheltered, dry, and wind-complimentary infinite. Always point the open sensor cavity downward as reduce the amount of dust floating in.
The most important tip here is to never touch the imaging sensor – under whatsoever circumstances – with anything other than the cleaning swap. You shouldn't fifty-fifty be using the same side of the swab more than once.
Imaging sensors are extremely sensitive and fragile, so all it takes is one scratch or smudge to completely mess up a photograph-shoot and cost you a lot of money.
Concluding Thoughts
Well washed for taking the time to brand certain yous don't brand a mistake here. Camera sensors are incredibly advanced but this makes them fragile and piece of cake to wreck.
With the right tools and techniques laid out in this guide, y'all'll be able to get perfectly make clean sensors safely.
Accept what you've learned here on how to clean a photographic camera sensor and carefully put information technology into practice. Stick close to our steps and you'll be taking crisp and abrupt images in no fourth dimension! Good luck!
Source: https://gadgetpursuit.com/how-to-clean-a-camera-sensor/
Posted by: brownsheill.blogspot.com
0 Response to "How To Clean A Camera Sensor With Ibis"
Post a Comment